Basic Layout
This is the basic layout of the Layer Stack panel. The first row holds the dropdown for you to select which channel you are working on. This is used when adding masks, filters, etc. It will be explained in detail in the cases where it's used. Next to it is the texture popover.
Below that row you can see the layer operators and then the actual stack of layers.
Layer Operators
The buttons on the left side of the layer operators are used to add different types of layers. The right side is then used to manipulate the added layers
Add Normal Layer
The first button in the row is used for adding a normal layer. These are the most common type of layers which you can paint on and add textures to.
Add Filter Layer
The second button is for adding filter layers. They are layers that can apply filters like changing the hue to all layers below. If you want to add a filter to just one layer you do that in the layers settings.
Add Folder Layer
The next button adds a folder layer. You can move other layer types in folders to add masks to all of them, or just organize your layers better.
Add Sub-Material
This button opens a popup for selecting a Sub-Material. Sub-Materials are basically folders that contain other layers. The folder can then show settings from the layer for quick tweaking of settings. This is good for adding materials quickly.
Duplicate Layer
This button duplicates the selected layer.
Move Layer
These buttons move the selected layer up or down in the layer stack. If the layer is above an open folder it will get moved in to the folder.
Delete Layer
This button will remove the selected folder.
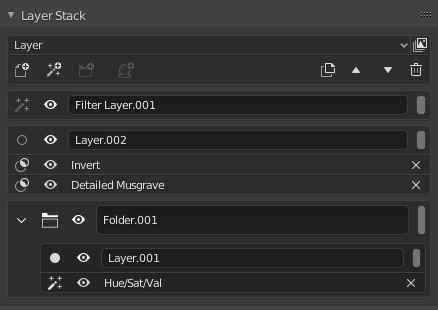
Layers
Below the layer operators you can see the stack of layers. The layers are all structured in a similar way but have differences.
Normal Layer

The first button on the layer is for selecting it. When you have a layer selected you can change the settings for that layer. Next to it you have the eye icon for hiding the layer. Following you have the name of the layer and a color which helps you to better see the layer in the stack.
Below the main layer you can see a list of the masks, filters and vector fx that have been added to the layer. When you click the first icon on one of these, it will show open up the settings for it. The eye icon hides it and the x removes it.

When you use the channel dropdown mentioned above, you can see that the layer changes. The layer channel shows settings that effect all channels in a layer. When you select a different channel, you'll see settings for that channel. This also applies to the layer stack.
You can see that there is now a dropdown which says 'Mix'. This is the blending mode of the channel which you can change here. Next to it is the opacity of the layer. Another change is that the eye icon now doesn't hide the layer but only the channel you have selected. Finally you can see that the masks don't show up anymore. This is because they were added to the layer and not to the channel we have selected.